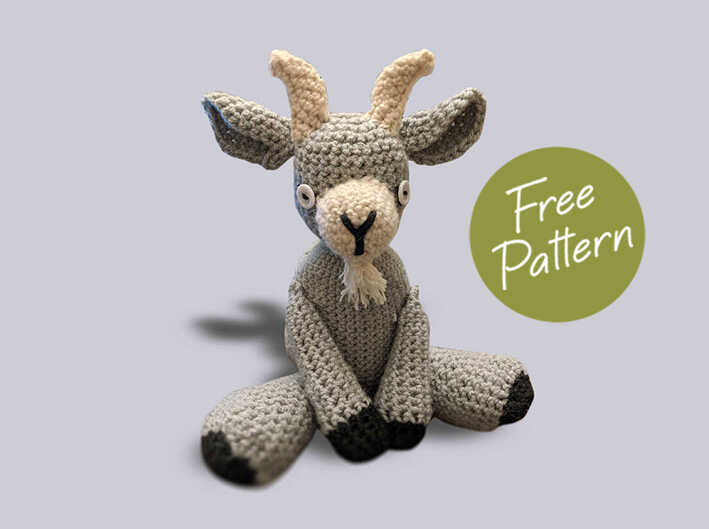
Crochet Goat Amigurumi Free Pattern
Arms (make two)
(start in black, switch to grey where indicated)
1) Into magic ring- 6sc
2) 2sc into each stitch around (12)
3) Sc into each stitch around for 3 rows (12)
4) Switch to grey yarn
5) Sc into each stitch around for four rows (12)
6) Sc into first four stitches, sc2tog repeat (10)
7) Sc into each stitch around for seven rows (10)
8) Stuff the arm. Make sure to fill the hoof
9) Sc into first three stitches, sc2tog repeat (8)
10) Sc into first two stitches, sc2tog repeat (6)
11) Sc into first stitch, sc2tog repeat (4)
12) Sc2tog twice.
13) Tie off.
Horns (make two)
(cream yarn):
1) Into magic ring – 4sc
2) 4sc around
3) 1sc, then 1 inc in next two, 1 sc. (6)
4) 2sc, 1 inc in next two, 2 sc (8)
5) 3sc, 1 inc in next two, 2sc (keep going) sc2tog (9)
6-9) 3sc, 1 inc in next two, 3sc, sc2tog twice (9) Tie off.
Tail: (grey yarn)
Taylor does not have a tail, but if you want one, repeat the pattern for the Horns, in grey yarn.
Ears (make two)
(grey yarn):
1) Into magic ring- 6sc
2) 2sc into each stitch around (12)
3) Sc into the first stitch, then 2sc into the second stitch repeat around (18)
4) Sc into first two stitches, then 2sc into the third stitch repeat around (24)
5) Check your ear. You may want to stop here, depending on the size you’re going for.
6) If you want larger,* sc into first three stitches, then 2sc into the fourth stitch* repeat around (30)
7) Fold the circle in half, and slip stitch 3 stitches together along the sides, to keep it slightly folded. Tie off.
Assembly:
1) Sew the nose onto the middle of the head.
2) Just above the nose, stitch on the buttons for eyes. If you want to give them the horizontal goat slit, make sure you position the buttons correctly so you can sew across two opposite holes and leave the other two empty.
3) Stitch the horns on either side of the top of the head. Placement of these (and the ears) will give your goat a lot of their personality, so take your time and make sure you like how it looks.
4) Stitch the ears just behind the horns, and slightly lower on the head.
5) Now you can stitch the head onto the body.
6) Taylor is assembled with his legs tucked just under the bottom of his body, to make it easier to sit. Depending on your plans, you might want to stitch the legs into the center of the bottom, so they can dangle down. Either works.
7) Stitch the arms to the side, keeping your stitches mostly around a single point. This will allow the arms to hang to the side or you can move them to the front when your goat is sitting.
8) If you made a tail, stitch it on the butt.
You goat is done! Congratulations!
