R29. (SC1, SC Inc)x 6 (18)
R30. (SC2, SC Inc)x 6 (24)
R31. (SC3, SC Inc)x 6 (30)
R32. (SC4, SC Inc)x 6 (36)
R33. (SC5, SC Inc)x 6 (42)
R34. (SC6, SC Inc)x 6 (48)
R35 – R43. SC 48 around ** (48)
** place a stitch marker in between row 39 and row 40, you will attach your safety eyes here later.
When I start decreasing i the head part, I tend to change the colour from skin colour to white, this allows me to determine the positioning of the hair more accurately later on. This is a personal preference of course, and if you prefer continuing in skin colour, please feel free to do so !
R44. (SC6, SC Dec)x 6 (42)
R45. (SC5, SC Dec)x 6 (36)
R46. (SC4, SC Dec)x 6 (32)
R47. (SC6, SC Dec)x 6 (24)
The Sausage
Before you continue Decreasing, you will make the ‘sausage’ for the neck part.
Starting with skin colour ;
SC 5 into MC
R1. (SC Inc) around (10)
R2 – R14. SC10 around (10)
Stuff firmly, it is important that the sausage be firm to be able to support the neck, so
don’t skimp on the Fiberfil !
Place the sausage in the neck, making sure it covers it and that the bottom part of the sausage meets the body. (you can gentle squeeze the body to feel where it should go)
The Eyes and the Nose
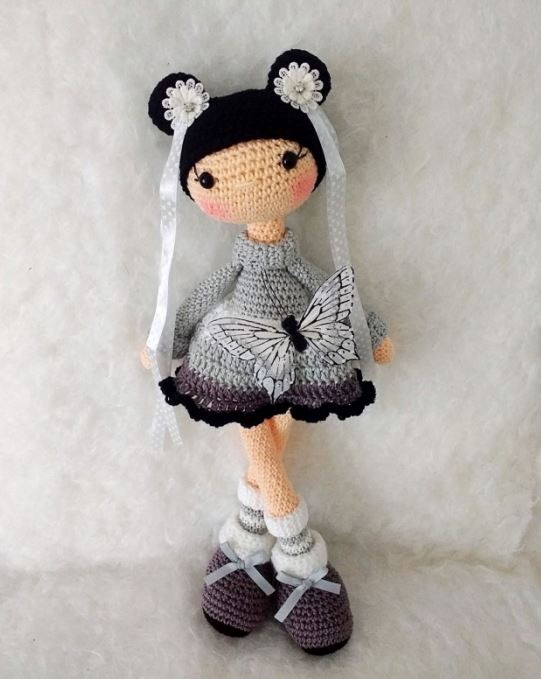
Attach the safety eyes in between R 11 & R 12 of the head, leaving a space of about 8 stitches in between them. If you do this at this point, you can still easily add eyelashes to the eyes before securing them, because the stitches can still be easily reached with your needle. I usually use a piece of black 4ply cotton thread, of which I remove two strands. You can also use embroidery thread if you have this, and glue on some fake lashes, whichever you prefer.
Now, create a nose with the skin coloured yarn , one row down and in between the eyes. Make two stitches over the width of 2 v-stitches (SC’s)).
Stuffing the Head
In order for the head to have a nice, round and even shape, without lumps or bumps, it is key to stuff it with care. I proceed as follows ; Put four fingers into the head, carefully stretching the fabric of the bottom part with your index finger and your middle finger.
Don’t stretch your crochet work out too much, though ! Take some Fiberfil, pry it open, gently place it across the bottom of the head, repeat, working in layers as it were and making sure to carefully line all the sides as well. The middle part is left unfilled for now, so it should look a bit like a donut. You stuff the middle in the end of the stuffing process, this when the sides are all lined, this is for an even result, without lumps, from the bottom up, all the way to the top.
You can give the cheeks a flush of colour, or even make a freckle or two ? I use light pink blush and apply it with an eyeshadow brush. Dip the brush into the blush, swipe over a paper towel to remove the excess and apply carefully. Less is more, so apply carefully, you can always add more if need be. If you apply too much, you won’t be able to correct it anymore, so I urge you to be vigilant !
Proceed with closing the head;
R48. (SC2, SC Dec)x 6 (18)
R49. (SC1, SC Dec)x 6 (12)
Fasten off, weave in ends.
The Arms (Make two)
With skin colour ;
R 1. SC 5 into MC (5)
R 2. (SC Inc)x 5 (10)
R 3 – R6. SC 10 around (10)
! Change to silver
R 7 – R 30. SC 10 around ** (10)
** Start stuffing when you’ve arrived at approx. Rnd 12.
You will not stuff the rest of the arm, just like the legs aren’t stuffed completely . This is to ensure the arms from falling/hanging nicely at the sides of the body. Pinch the arm together and crochet together two by two stitches. (4) Attach both arms onto the body at approx. the height of the neck, right where the colour changes from skin colour to silver.
Ribbing/Brim for the neck
This part of the pattern is crocheted in rows, not in a spiral.
The finished piece should look like a small rectangle.
With silver ;
R1. Ch 8, SC into 2nd from hook, SC6, tCh (7)
R2 – R 22. SC7 , tCh around for 21 rows (7)
Fasten off. Leave a long tail for sewing.
Depending on how firmly you’ve stuffed the body, you might need to make a row or two extra here.
Fold in two and sew shut at the ‘short’ sides. Place onto the colour change of the
neck part (silver to skin colour), with the fold facing up.
Because it can be a bit of a challenge to attach this part, I always pin it into place first. I also press the arms down to the sides of the body, in order to make it easier to wrap the ribbing around the neck. Sew together the two short sides of your rectangle, creating a seam, which should be positioned at back of the neck. Secure the ribbing onto the body with a few strategically placed stitches. Be careful not to pull your stitches too tough, or you will get an uneven, ‘bumpy’ result !
The Ribbing for the Sleeves/Arms (Make two)
This part of the pattern is crocheted in rows, not in a spiral.
The finished piece should look like a small rectangle.
With silver ;
R1. Ch 8, SC into 2nd from hook, SC 6, tch (7)
R2 – R 17. SC7 , tCh around (7)
Fasten off. Leave a long tail for sewing.
You might also need a row or two more here, again depending on how firmly the arms have been stuffed. Fold over the finished piece, sew close on the shortest sides, pin into place and attach to the arm where the colour changes from silver to skin colour, the fold facing down. Sew both short sides together, creating a seam. Secure with a few stitches, making sure your seam faces the back of the arm. Again, do not pull too hard on the stitches here, so you don’t get any ‘lumps’, and the ribbing stays nice and even.
