Hi there...
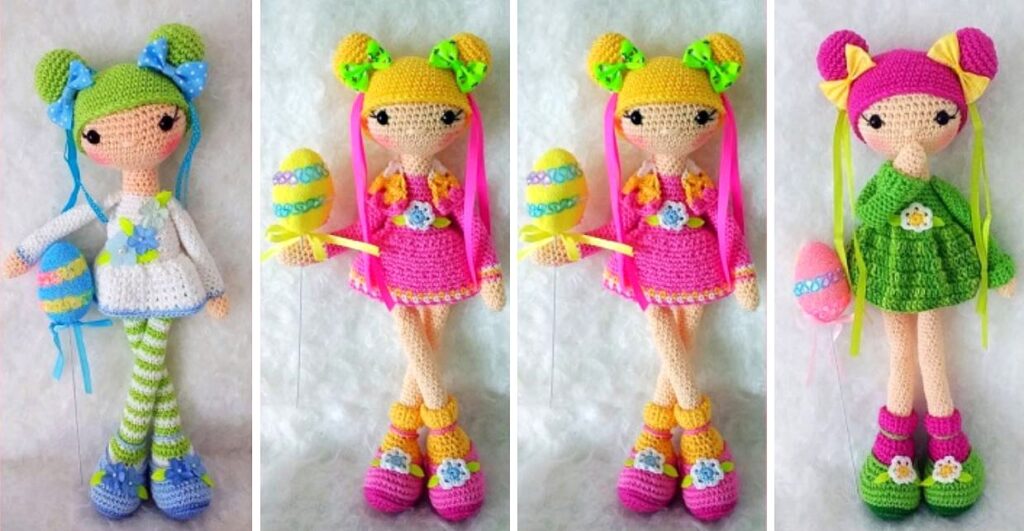
One of the free amigurumi crochet patterns we will share today is the amigurumi doll.. You can learn how to crochet these bunny using the free amigurumi pattern.
Materials
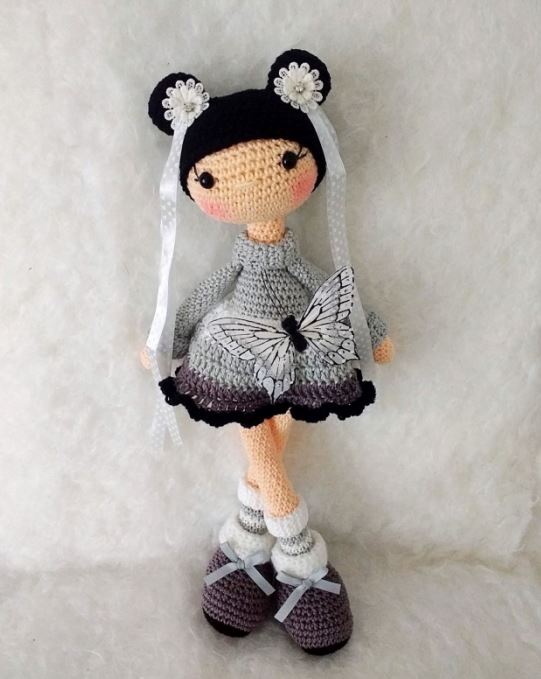
• Lammy Yarns Rio (or other cotton yarn) in the following colours ; silver (003),
grey (004), white (005), black, skin colour (218).
• Super Soft Yarn from Zeeman ; White
• A 2 mm crochet hook , or a hook matching your yarn
• Yarn needle, embroidery needle
• Safety eyes (8/9 mm diam.)
• Scissors
• Tape measure
• Safety pins
• Stitch markers
• Some blush for the cheeks
• Accessories; e.g. Butterflies, Easter Eggs, ribbons, buttons, … you can find
these online or at a local craft supply or yarn shop or Action, Xenos even
Zeeman or Wibra
• Stuffing (Fiberfill)
• Optional ; embroidery thread
When Jacky is crocheted with a 2mm crochet hook and the indicated yarn, she will
be about 40 cm tall
Abbreviations
Yo – Yarn over hook
ch – Chain
tCh – Turning Chain
Chstch – Chain stitch
Slstch – Slipstitch
MC – Magic Circle
BLO – Work into the back loop of the stitch only
tch – Turning Chain
TW – Turn your work
SC – Single Crochet
HDC – Half Double Crochet
DC – Double Crochet
tog – Together
2 tog – Crochet 2 stitches together, making one stitch out of two or Decrease (Dec)
Inc – Crochet two stitches in one stitch making two stitches out of one or Increase
(..) Total of stitches after a round or row
R – Row or Round
() x 6 – Repeat the action between brackets, times 6, or for the indicated number of times
Unless mentioned otherwise, we will be working in continuous rounds ! Also, take care to watch out for the colour changes in certain parts of the pattern, they will be indicated as such.
Shoes (Make two)
With black ;
Ch 10
R1. In 2nd chain from hook ;
SC2, SC7, SC Inc, proceed into the opposite side of the chain (so, do not turn, just
keep on working in the back bumps of your chain, so you get a continuous ‘spiral’)
SC2 in same chain (in total you should now have 4 SC’s in the same Chstch), SC7,
SC Inc (22)
R2. SC Inc, SC1, SC Inc, SC 5, SC Inc, SC1, (SC Inc)x2, SC1, SC Inc, SC5, SC Inc, SC1,
SC Inc (30)
R3. (SC Inc)x2, SC2, SC Inc, SC6, SC Inc, SC2, (SC Inc)x 3, SC2, SC Inc, SC6, SC Inc,
SC2, SC Inc (40)
R4. SC4, SC Inc, SC15, (SC Inc)x 2, SC13, SC Inc, SC4 (44)
R5. BLO SC 44 around (44),
R6. Change colour to grey SC44 around (44)
R7 – R8.SC 44 around (44)
R9. SC18, (SC1, SC Dec)x 6, SC11 (38)
R10. SC38 around (38)
R11. SC12, (SC1, SC Dec)x 6, SC8 (32)
R12. SC32 around (32)
R13. SC10, (SC Dec)x 8, SC6 (24)
R14. SC24 around (24)
R15. (SC2, SC Dec)x 6 (12)
R16. SC12 around (12)
Change colour to grey
R17. SC4 (you arrive in the middle of the back part of the shoe), change to white, Slstch, SC18 (18)
R18. HDC18 around (18)
R19 – R20. HDC 18 around (18)
R21. (HDC 2, HDC Inc)x 6 (24)
R22. HDC 24 around (24)
R23. HDC23, SC1, HDC1 (24)
Fasten Off. Leave a tail for sewing the leg into the shoe later on. Fold over the ribbing
(brim) of the shoe. Make the second shoe.
Stuff only the shoe part, not the brim. You’ll need this space later on, for the leg.