Hi there, amigurumi fans!..
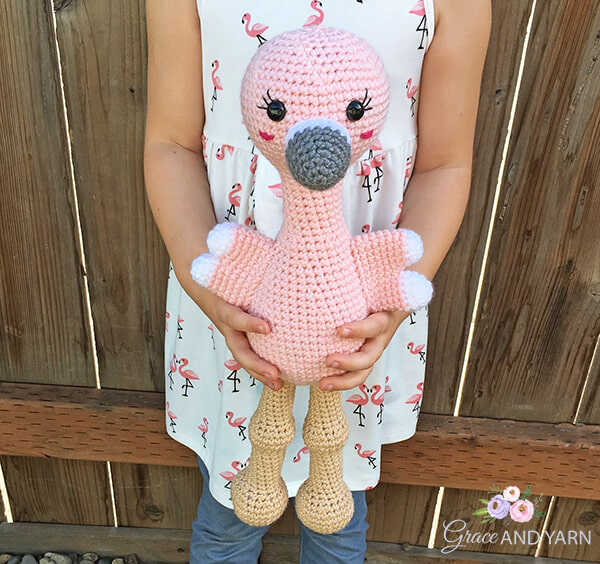
Add a touch of tropical charm to your handmade collection with the Free Crochet Flamingo Amigurumi Pattern designed by Grace and Yarn. This adorable project is perfect for crafters looking for a step-by-step, beginner-friendly pattern that still delivers a polished, professional finish. The seamless design, featuring a beautifully shaped body and head, makes this flamingo an eye-catching piece for nurseries, gifts, or your own amigurumi display. Many thanks to Grace and Yarn for sharing this lovely pattern and making it accessible for crocheters of all skill levels.
To begin your flamingo, gather a few essential materials: Size 4 worsted weight yarn (125g of pink plus small amounts of white, grey, and beige), a 3.5 mm crochet hook, 12 mm safety eyes, black crochet or embroidery thread for optional eyelashes, scissors, a tapestry needle with a bent tip, stuffing, and stitch markers. With these tools and the pattern’s clear guidance, you’ll enjoy bringing this charming flamingo to life from the first stitch to the final detail. And once you finish, be sure to check the end of the pattern for more inspiring amigurumi flamingo ideas to spark your creativity.
Designer: Grace and Yarn
Instagram: @graceandyarn5
Materials
Size 4 worsted weight yarn (125g of pink; small amount of white, grey, and beige)
3.5 mm crochet hook ( I use and love these hooks!)
12mm safety eyes
Black crochet/embroidery thread for eyelashes (optional)
Scissors
Tapestry needle (these bent tips work wonders for amigurumi!)
Stuffing
Stitch markers
Abbreviations – US terminology
MC- Magic circle
SC- Single crochet
SC INC- Single crochet increase
INV DEC- Invisible decrease
St(s)- Stitch(es)
Sl st – Slip stitch
Notes
– Slowlystuff as you go, you want it to be firm but not stretched. I recommend stuffing the body before crocheting the neck.
– You will be working in the round; I like to use a stitch marker at the beginning of each round.
– The body and head will be made as one piece. I recommend tight stitches and firm stuffing to help avoid a wobbly neck.
Beak
With grey
Round 1: Create a magic circle with 6 SC
Round 2: SC INC in each st (12)
Round 3: SC around (12)
Round 4: SC in the first st, SC INC in the next, repeat around (18)
Rounds 5-7: SC around (18)
Change to white
Rounds 8-9: SC around (18)
Fasten off leaving a long tail for sewing onto the head.
Body
With pink
Round 1: Create a magic circle with 6 SC
Round 2: SC INC in each st (12)
Round 3: SC in the first st, SC INC in the next, repeat around (18)
Round 4: SC in the first 2 sts, SC INC in the next, repeat around (24)
Round 5: SC in the first 3 sts, SC INC in the next, repeat around (30)
Round 6: SC in the first 4 sts, SC INC in the next, repeat around (36)
Round 7: SC in the first 5 sts, SC INC in the next, repeat around (42)
Round 8: SC in the first 6 sts, SC INC in the next, repeat around (48)
Rounds 9-15: SC around (48)
Round 16: SC in the first 6 sts, INV DEC in the next, repeat around (42)
Rounds 17-18: SC around (42)
Round 19: SC in the first 5 sts, INV DEC in the next, repeat around (36)
Rounds 20-21: SC around (36)
Round 22: SC in the first 4 sts, INV DEC in the next, repeat around (30)
Rounds 23-24: SC around (30)
Round 25: SC in the first 3 sts, INV DEC in the next, repeat around (24)
Rounds 26-27: SC around (24)
Round 28: SC in the first 2 sts, INV DEC in the next, repeat around (18)
Rounds 29-36: SC around (18)
Here is where we will start the head
Round 37: SC in the first 2 sts, SC INC in the next, repeat around (24)
Round 38: SC in the first 3 sts, SC INC in the next, repeat around (30)
Round 39: SC in the first 4 sts, SC INC in the next, repeat around (36)
Round 40: SC in the first 5 sts, SC INC in the next, repeat around (42)
Round 41: SC in the first 6 sts, SC INC in the next, repeat around (48)
Round 42: SC in the first 7 sts, SC INC in the next, repeat around (54)
Rounds 43-50: SC around (54)
NOTE: Here is where we will attach the facial features. Place the safety eyes 7 stitches apart between rounds 47 and 48. (For a girl version, I recommend sewing on the eyelashes before securing your safety eyes).
Beak – Sew the beak centered between the eyes with a small amount of stuffing.
Cheeks – With your tapestry needle and yarn for cheeks pass through one stitch on either side of your beak just under the eyes.

(Be sure to stuff the neck and shoulders firmly as you go. This will keep the neck sturdy.)
Round 51: SC in the first 7 sts, INV DEC in the next, repeat around (48)
Round 52: SC in the first 6 sts, INV DEC in the next, repeat around (42)
Round 53: SC in the first 5 sts, INV DEC in the next, repeat around (36)
Round 54: SC in the first 4 sts, INV DEC in the next, repeat around (30)
Round 55: SC in the first 3 sts, INV DEC in the next, repeat around (24)
Round 56: SC in the first 2 sts, INV DEC in the next, repeat around (18)
Round 57: SC in the first st, INV DEC in the next, repeat around (12)
Round 58: INV DEC around (6)
Fasten off and sew remaining part closed, weave in your end.
